 |
| Ork Bommers |
Today I got the new Ork Bommer kit. Actually it isn't just a bommer but a Dakkajet, Burna Bommer and Blitza Bommer in one box but unless you've been living under a rock you will probably know all this.
Since this is a brand new model I thought it would be nice to keep track of my progress. It's hard to say how long it will take to finish this model so just sit back and relax. Lately I've been slacking on my blogging so this will also be a nice project to get my blog going again. I have got a lot of things done that haven't yet made it to the blog so I'll play a bit of catch up in between posts of my Bommer Project.
So on with the good stuff. The kit comes in a nice big box. (don't you just love the smell of fresh models when you open the box??) It contains three grey sprues that have everything on it to assemble 1 of the three models. It also has the flyer stand, clear plastic sprue for the pilot canopy, some decals and of course the instruction manual.
 |
| Magnetized bombs |
My challenge will be to make a model that can feature as all three of the different bommers. I will be using tiny magnets to attach the little rockets and bombs. The assembly was easy but getting those tiny magnets in the right place was a bit of a pain. You can glue all the bombs, rockets and guns on the plane because with some minor adjustments there is enough room for them. However I like to be able to field the plane like it should be and if I fire some rockets that I can take them off the plane and don't have to remember how many I already fired.

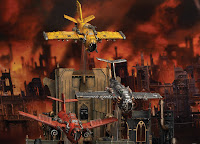
After about three hours I had the model like I want it. everything magnetised and I even took out a pen and sketched some freehand on it to see if it would fit and how it would look. As you can see I'm going with flames on the wings. I will paint the main body yellow to go with the rest of my army so the black flame pattern fits in well. On the nose I want to paint a sort of shark mouth like you see on Bell hue helicopters and warthog plane. I had to remove two of the 'Teeth' that were on the front end otherwise it wouldn't fit or look right.
So this basically is what it looks like when I had put it all together and loaded up all the bombs and rockets. All ready for priming. Of course the canopy isn't glued on yet and I I haven't glued the pilot or Grot gunner yet so It will be easier to paint those individually.
Today was beautiful priming weather so I got some of mt Tamiya surface primer and got the job done. The reason I chose the light grey primer is because it works nicely and gives me a better undercoat for yellow paint.
I'm all fired up and ready to go so will you follow me and this project?If you have any questions or suggestions please drop them in the comment section below.
Cheers,
Seb


1 comment:
Looks a very nice kit, i'm looking forward to seeing how the paint job turns out.
Post a Comment